


INSPIRATION
Mabes Makes: Easy Cheese Scones
A mouth watering, easy cheese scone recipe. Perfect served warm with butter....

Friends That Rhyme (Sabine & Nadine) offer unique, handmade clutches and wristlets featuring upcycled vintage textiles; all are crafted with a fair and slow fashion approach.
So many people are cleaning out their closets, trying out new projects, and looking for ways to connect with loved ones…this necklace upcycle is the perfect combo: make up a few and send a lovely surprise to someone special! Plus, it’s the perfect accessory for all those video calls!
We love vintage textiles. There’s something about knowing that a piece of fabric has history, a story that makes it so special. And while many pieces in our closets may not have that actual vintage quality, they can still evoke a memory of a laugh with a friend, the joy of receiving a gift from a loved one, or a special time in your life. But, some of those items are not ones that we still love to wear…time to upcycle! Using these instructions, you can turn your closet castaways into an eye-catching accessory.
This project is great for any level of sewer and will likely take 1-2 hours, depending on your skill and the method you choose. We suggest you read through the instructions completely before you start as you have a few decisions to make.
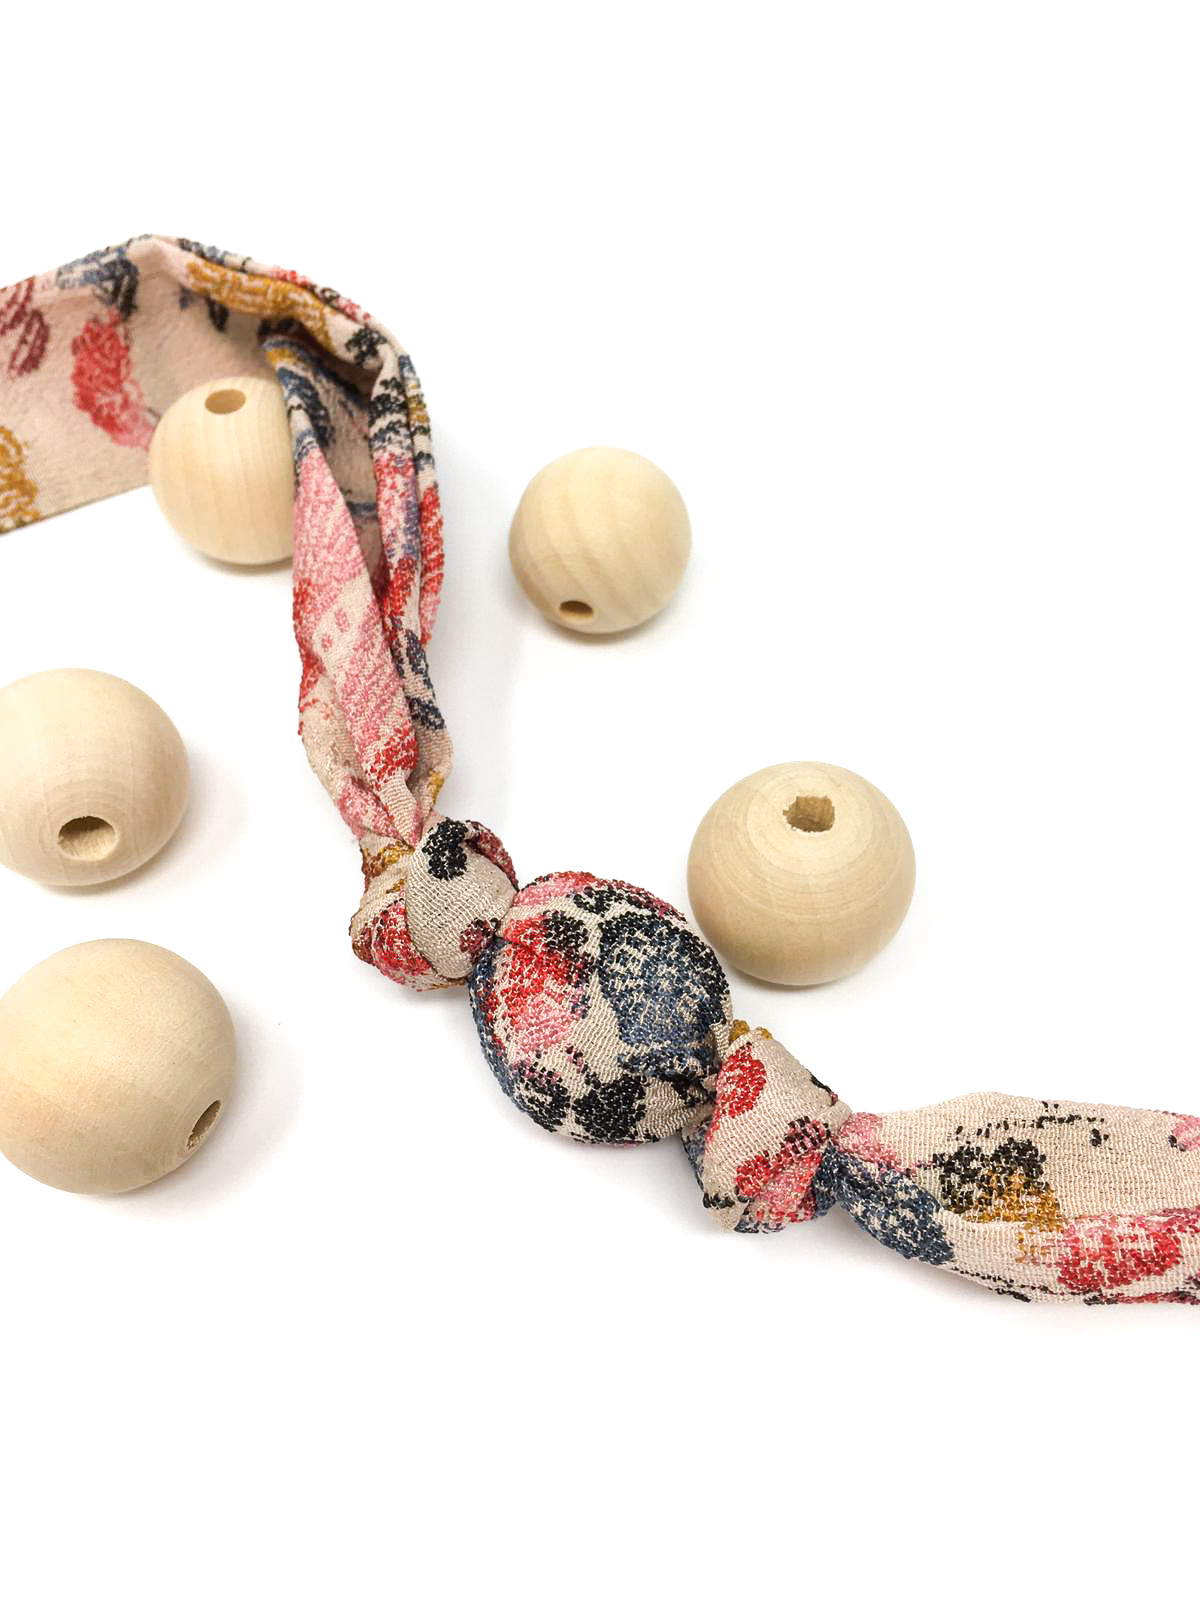
First, the materials:
Step 1: Determine the measurements for your fabric. We use 140cm long (see Step 5A for an alternate measurement based on your method). You can sew multiple strips together to get to the right length. As for the width, it’s based on the circumference of your beads. You need the width to equal the circumference of your bead plus seam allowance…and a little extra to give you some wiggle room. For example, if the beads have a 7cm circumference, and your seam allowance on your sewing machine measures .5cm, then you need to cut your fabric 8.25cm wide. You will end up with a long skinny rectangle.
Step 2: With right sides together, fold your fabric in half lengthwise and secure in place with straight pins. Sew one short end together as well as the long side using your matching thread. We recommend also sewing a zig zag along your edge so it doesn’t fray. You’ll end up with a very skinny long tube. Turn it right side out and gently iron the ends at a low temperature to make them nice and flat with sharp corners.
Step 3: Measure 26cm from the end that has been sewn closed and tie a knot in the tube at that point. Pull it tight.
Step 4: Slide your first bead inside the tube from the open end, until it gets to the knot.
You have two options for the next step:
Step 5A: Secure your bead tight against the first knot by tying a second knot in the tube after the bead. You’ll end up with a knot, then a bead, then a knot in a row. This option is quick and easy. You’ll have a shorter necklace (about 72cm using about 16 beads), and with a “chunkier” look. Your knots will add volume between your beads, which will look slightly less defined. If you want a longer piece using this method, you’ll need to a fabric length of 220cm and about 25 beads. That will yield a necklace of about 115cm.
Step 5B: Use a needle and thread (in your choice of matching or accent colour) to gather the fabric after bead and secure it in place. This also defines the shape of the bead. Pull the thread through your needle so it is doubled. Using your fingers, gather the fabric tightly around the bead on the opposite side to the original knot. Holding a tail of thread that is at least 10cm long, wrap the thread around the fabric tightly. Push the needle through the middle of the gather and wrap around again. Do this repeatedly to secure the bead. Tie it off as tight as possible, using the tail of thread that you left hanging. Trim the ends. Your necklace will be about 115cm long and use about 25 beads.
Step 6: Add another bead and repeat the knotting or thread-tying. Keep going until you get to about 28cm from the open end.
Step 7: Tie another knot in the tube, tight up against the final bead.
Step 8: Tuck the open ends of the fabric inside the tube and hand stitch or use the sewing machine to close.
Step 9: Tie the tails together in a knot or bow to adjust the length of your necklace.
TA-DA! You have a gorgeous, upcycled necklace that gives new life to something that has been hiding at the back of your closet. Be sure to tag @friendsthatrhyme with your creations…we can’t wait to see what you make!
INSPIRATION
A mouth watering, easy cheese scone recipe. Perfect served warm with butter....
INSPIRATION
As an expat child, I bounced from country to country, picking up interior...

INSPIRATION
British designer, artist and member of our Wolf & Badger...
INSPIRATION
Lucrezia Worthington is a freelance travel journalist, social media manager...
INSPIRATION
I have been hearing a lot of whispers of the roaring 20’s post-pandemic...